


So I just set up my new film lighting/ make up vanity, and I did it ALL BY MYSELF!! The desk and vanity lights were configured completely by me [with the help of the internet].
Anyways, I have been dying to get a great quality vanity set up that didn't cost hordes of money like the ones I see all the other makeup Gurus have. So, if you are willing to get your hands a little dirty [figuratively...not really] and save over $300 building your own vanity lighting, continue reading.
UNEDITED PICTURES OF ME TAKEN WITH THE NEW LIGHTING IS AT THE END OF THIS POST

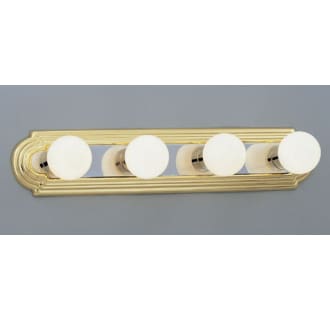
So the wall fixture was purchased from lightingdirect.com. This was the cheapest place on the internet I found them [ONLY $5.88 each], and you cant really go wrong. So I purchased 2 of them. They came in this yellow gold color which I really didn't care for so I spray painted the rim black and left the chrome center piece. The thing is, these are designed to be a wall fixture, so they have exposed open wires.
So, I went to the ever-so-fabulous google.com and looked up how to convert a wall fixture into a plug in and I came across a blog called perfectprospect.wordpress.com. A direct link to his blog will be posted below.
I had to go to HomeDepot and purchase this Westinghouse 6ft cord set, which only cost me $5.97 each (I purchased 2). As you see it is actually used for chandelier lighting, but I modified it. I cut off the head where the bulb enters, and then I stripped the wire about 1 inch down, so the wires were exposed.
Unfortunately I do not have any pictures of those steps so I would suggest you to take a look at this link:

Alright, hopefully you took a look at the link above, because I am going to skip ahead a few steps. After my white and black wires were twisted together and safely secured with wire caps, I just taped them to the inside of the fixture with wire tape so there wouldn't be any loose ends. Alright, so we are more than halfway done!
Next, choosing the lighting for me was a little difficult but I ended up choosing the EcoSmart 23-Watt Bright White CFL Light bulb. They came 4 in a pack and were only $9.97 (So I purchased 2 packs). They are very Eco Friendly and are extremely bright, emitting a total of 3200 Lumens! (My brother said if you stood outside my room door with the lights on, it looks like I was being visited by a UFO! LOL) These are great because they don't get very hot. I can have them on for the duration of my filming (which can take hours) and my room will not get hot and steamy!

To hang my fixture, I used these steel sidewinder picture hangers. You just push them into the wall and they can hold up to 35 pounds.

My total cost for my lighting set up is:
(5.88 x 2) + (5.97 x 2) + (9.97 x 2) + (3.24 - Sidewinder picture hanger) + (1.69 - Wire caps)=
48.57 Not including tax!!!!!!
That is music to my ears!! I saved over $350 compared to the Vanity Girl Hollywood Mirrors I was looking into...YIKES!
Don't believe me? Take a look!
I am happy I sucked it up and did it myself. I love it!! I do plan to purchase more professional lighting for my room that is a little more portable, but for now, this will do. I am loving the results it is giving me.
Take a look at the pictures below. These were shot with my Nikon D5100 camera and this lighting. This pictures are 100% unedited!


Thanks for reading! Stay tuned for new videos with my new set ups! See you later!
Smooches :*

No comments:
Post a Comment